From time to time, you get into a situation you need to compile and run your Java code, and instead of using any build tool or IDE, you need to do it manually. If you are engaged in software development or writing automated script writing, compiling and executing code from the Windows console should be straightforward and effortless.
We will use the following simple code to print a code into the terminal or command prompt for demonstration purposes.
public class MyJavaApp {

    public static void main(String[] args) {
        System.out.println("Hello World!");
    }

}
Compile and run Java code in a few steps
You must follow only a few basic steps to compile and run Java code.
- As a precondition, ensuring the installation of Java Development Kit (JDK) on your system and the accessibility of the
javacandjavacommands from the terminal or command prompt is important. - First, you have to have a Java source code in Java files. Open a text editor and write your Java code. Save the file with a
.javafile extension. - Then you are ready to compile the Java source file. Open a terminal or command prompt and navigate to the directory where your Java source file is placed. Utilize the
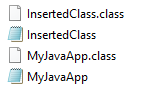
javaccommand for compiling the Java source file into bytecode. For example:javac MyJavaApp.javaYou will generate a bytecode file named
MyJavaApp.javaif there are no compilation errors. - When you have successfully compiled the Java source file into a bytecode file, you can execute the bytecode using the
javacommand. However, select the class which contains validpublic static void main(String args[])Java method in order for JVM to have an access point to your code.Here is an example of running MyJavaApp:
java MyJavaAppAnd here is the output:
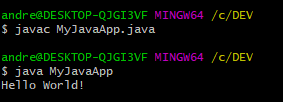
java MyJavaAppwill run your Java program, and if everything is correct, you should see the output in the console.
Compiling and running nested classes
So far, we have seen compile and run only a single class. However, running a multi-class project is no different from compiling and running a single class. Here is an example of a multi-class project we will use next.
public class MyJavaApp {
public static void main(String[] args) {
InsertedClass.printToWorld();
}
}
public class InsertedClass {
public static void printToWorld() {
System.out.println("Hello World from other class!");
}
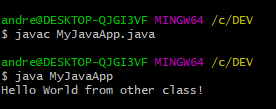
}For sure, the same as in a single class, you need to pick a class for compiling the class which contains the public static void main(String args[]). That is the only way the compiler can reach and compile all classes in your project.
And again, same as in the single class, you need to run the multi-class project with the java command on the file, which contains public static void main(String args[]) method.
Conclusion
This article has shown how to compile and run Java code on the Windows platform.
Did you find compiling and running your Java code easy? Do you have your trick or know another way how to compile and run Java code from the terminal or command prompt? Let us know in the comments below the article. We would like to hear your ideas and stories.