This article provides a clear tutorial on generating code infrastructure defined OpenAPI schema for your custom Spring Boot application and handling multipart file uploads through an autogenerated REST endpoint.
Introduction
Let’s imagine we want to build some simple user management app separated frontend with which we will communicate through REST.
Also, let’s add some limitations and requirements for our user management project. We will need to use the OpenAPI schema to generate the code infrastructure, as it can help us speed up interface development between the frontend and backend. We will focus on the implementation of code infrastructure on the backend side.
We generally want to receive and process multiple user files through multipart form data in Spring Boot.
Maven OpenAPI plugin
First, we must define a plugin in the pom.xml file to generate the code infrastructure from the OpenAPI schema.
Here is an example of the pom.xml file with the plugin definition:
<?xml version="1.0" encoding="UTF-8"?>
<project xmlns="http://maven.apache.org/POM/4.0.0" xmlns:xsi="http://www.w3.org/2001/XMLSchema-instance"
         xsi:schemaLocation="http://maven.apache.org/POM/4.0.0 https://maven.apache.org/xsd/maven-4.0.0.xsd">
  <modelVersion>4.0.0</modelVersion>

  <parent>
    <groupId>com.codepills.openapi</groupId>
    <artifactId>spring-boot-parent</artifactId>
    <version>1.1.0</version>
  </parent>

  <groupId>com.codepills.openapi</groupId>
  <artifactId>user-management-module</artifactId>
  <version>1.0.0-SNAPSHOT</version>
  <name>user-management-module</name>
  <description>User management module</description>

  <properties>
    <java.version>21</java.version>
    <project.build.sourceEncoding>UTF-8</project.build.sourceEncoding>
    <project.reporting.outputEncoding>UTF-8</project.reporting.outputEncoding>
    <version.swagger.codegen>3.0.50</version.swagger.codegen>
    <open.api.file>${project.basedir}/src/main/api-specification/OpenApi-UserManagement.yaml</open.api.file>
    <open.api.base>com.codepills.openapi.usermanagementmodule</open.api.base>
    <generated-sources-path>${project.build.directory}/generated-sources</generated-sources-path>
    <generated-sources-java-path>main/java</generated-sources-java-path>
  </properties>

  <dependencies>...</dependencies>

  <build>
    <finalName>${project.name}</finalName>
    <plugins>
      <plugin>
        <groupId>io.swagger.codegen.v3</groupId>
        <artifactId>swagger-codegen-maven-plugin</artifactId>
        <version>${version.swagger.codegen}</version>
        <executions>
          <execution>
            <id>generate-the-stuff</id>
            <phase>generate-sources</phase>
            <goals>
              <goal>generate</goal>
            </goals>
          </execution>
        </executions>
        <configuration>
          <inputSpec>${open.api.file}</inputSpec>
          <language>spring</language>
          <modelNameSuffix>Dto</modelNameSuffix>
          <configOptions>
            <sourceFolder>${generated-sources-java-path}</sourceFolder>
            <basePackage>${open.api.base}</basePackage>
            <modelPackage>${open.api.base}.api.model</modelPackage>
            <apiPackage>${open.api.base}.api</apiPackage>
            <interfaceOnly>true</interfaceOnly>
            <useBeanValidation>true</useBeanValidation>
            <library>spring-boot3</library>
            <dateLibrary>custom</dateLibrary>
            <jakarta>true</jakarta>
          </configOptions>
          <typeMappings>
            <typeMapping>DateTime=Instant</typeMapping>
            <typeMapping>multipartFile=org.springframework.web.multipart.MultipartFile</typeMapping>
          </typeMappings>
          <importMappings>
            <importMapping>Instant=java.time.Instant</importMapping>
          </importMappings>
          <output>${generated-sources-path}</output>
        </configuration>
      </plugin>
    </plugins>
  </build>

  <repositories>...</repositories>

</project>
As you can see, we have defined the SpringBoot module, and in it, the OpenAPI file is located at /src/main/API-specification/OpenApi-UserManagement.yaml. The OpenApi-UserManagement.yaml file will also be responsible for defining generated code infrastructure.
OpenAPI User management definition YAML
Let’s create the OpenApi-UserManagement.yaml file at /src/main/api-specification/ relative to the location of pom.xml
openapi: 3.0.2
info:
  title: User management module
  description: User management
  version: '0.1'
  contact:
  email: optional@email.com
servers:
  - url: https://localhost:8080/api/user-management

paths:
  /users/import:
    post:
      summary: Import User files
      tags:
        - UserManagement
      operationId: importFiles
      requestBody:
        content:
          multipart/form-data:
            schema:
              properties:
                userFiles:
                  type: array
                  items:
                    type: multipartFile
      responses:
        '200':
          description: Successful operation
          content:
            application/json:
              schema:
                type: object
                additionalProperties:
                  type: array
                  items:
                    type: string
        '400':
          description: Bad Request
As you can see, we have defined a simple endpoint for importing user files. The endpoint is defined as a POST request with a summary, tags, operationId, requestBody and responses.
It is essential to define the keywords for user files well. I picked up the userFiles, but you can use whatever you like. For example – simply files. The keyword will be used for the protocol to tie the files during transmission.
User Management Controller
Now, all we need to do is create a controller to implement the OpenAPI schema. User management schema name will be generated based on the tags in the OpenAPI schema.
Here is an example of the controller:
@RestController
@RequiredArgsConstructor
public class UserManagementController implements UserManagementApi {

  @Override
  public ResponseEntity<Map<<tring, List userFiles) {
    // ... your logic here ...
  }

}
I will leave the implementation up to you as it is not the main focus of this article.
Again, notice the userFiles keyword in the method argument. It is the same as the keyword as defined in the OpenAPI schema.
Testing with Postman
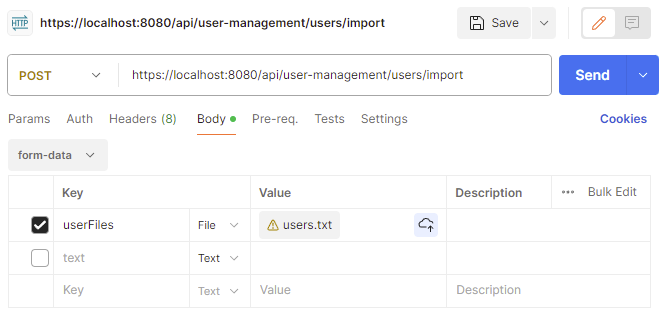
Let’s run the app; the last thing will be testing the endpoint with Postman.
As it might not be stressed enough so far, the most important thing is to use the same keyword as defined in the OpenAPI schema. In our case, it is userFiles.

And now, if the backend is running at localhost, and we added the necessary logic for file processing into the controller, we should be able to upload multiple files through the endpoint.
When using Postman, you also need to define the type of multipart key. It is either the String or File. For files, use File, and for the object, use String. The following article will discuss the implementation and use of mixed input.
Otherwise, all you need to do is to define your endpoint POST request as everything else. Select POST request, add the URL, and in the body tab, select form-data and add the keyword and the file.
Add multiple files with the same key “userFiles” and send the request.
Conclusion
This article has shown how to implement autogenerate of code from OpenAPI schema, how to define the schema for multiple file uploads and how to implement the endpoint at the Spring Boot backend. All you need to do is run your application and use the same keyword defined in the OpenAPI schema for the file upload.
Did you find autogenerate OpenAPI implementation and sending files through multipart requests easy? Do you have your trick or know another way to send effectively multipart requests with files? Let us know in the comments below the article. We would like to hear your ideas and stories.