This tutorial will show you how to debug your JAR or WAR file in IntelliJ IDEA remotely and give hints on developing new features through the application stack.
Prerequisites
Let me give you some essential tips for prerequisites to get successful and smooth remote debugging.
Debug same version as on the remote server
To debug a remote server-side application in your IntelliJ IDEA, you need to have the same version of your application or component on your side in IntelliJ IDEA as on the server-side. To do so, you shall first finish all the changes you want to test on the remote server. Then build your application and deploy it to the remote server. Only then you should run remote debug mode against your remote environment.
In reverse, if you can not change what is on the server, rebase your code repository on the commit of the JAR or WAR file set on the server. Then, build the application with the build tool of your choice (Maven/Gradle), and only then can you remotely debug.
Don’t make any additional changes before remote debug
Writing the following note might be unnecessary, yet it is better to say it aloud as a reminder. If you make any changes in your code between deployment on the remote server and running the application in remote debug mode, remote debug will not work. Even on the slightest change, remote debug will not decompile your breakpoint on the desired code line because Java bytecode will be different.
Build faster without tests
Just a tip – for a fast Maven build you can use mvn clean install -DskipTests.
For more information regarding running a Maven build without tests, check the article about how to build Java application with Maven without running tests.
Coordination your work with the rest of the team
If you are working in a team and want to be a good team player (or working on something very sensitive), let your teammates know you want to deploy and remotely debug your application. First, ask your colleagues, e.g. in Slack publicly, if it is OK to occupy test instance for a while. Then, coordinate your debugging according to the response or your organization’s policy. For example, let’s say you are clear to go if nobody responds in 15 minutes.
Adjustment of other parts
For more complex changes through the stack, changing and adjusting different system parts might be necessary. E.g., if you are working on the monolith, you might need to adjust the front-end client for testing purposes. In other cases, it might be necessary to change the database.
Adjusting other parts of the system might be necessary for the system to work and for you to be able to test changes through the whole stack.
In every case, do not forget to clean after yourself when leaving (check the last point of this tutorial for more info).
1. In IntelliJ IDEA, create new Run/Debug Configuration for Remote JVM Debug
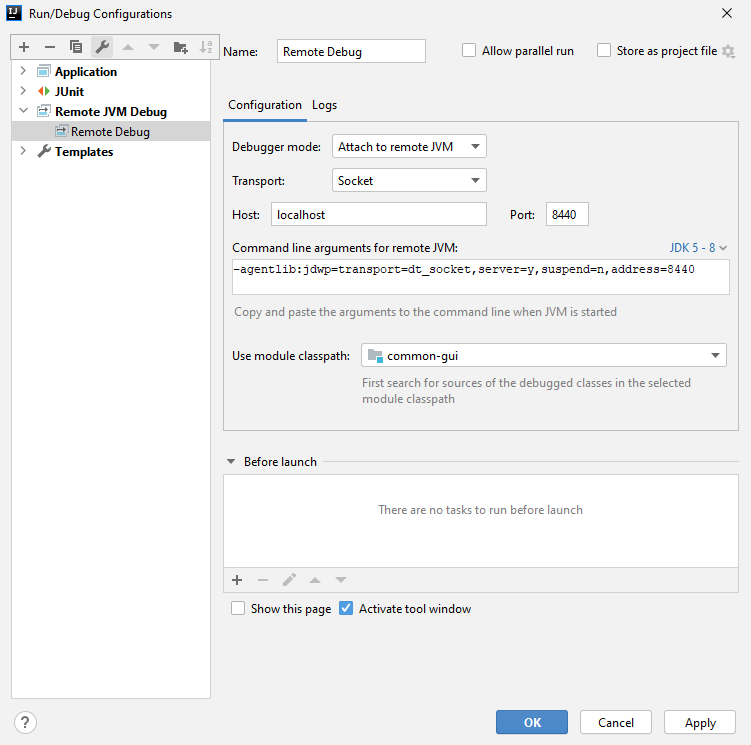
Example of setup in IntelliJ IDEA
You can change host and port configurations based on the remote environment you want to debug.
If using a multi-module project, select a module in Use module classpath.
2. Run remote debug configuration in debug mode
Connecting to the host should be nearly instant. So now, all you need to do is place the breakpoints in your code.
Then, when the application code executes in a connected environment, the line you set as the breakpoint should be reached, and IntelliJ IDEA will show you the stack trace. That is it, simple as that.
3. Do not forget to close your debug session
Do not forget to close your debug session. Unclosed sessions cause port/socket exhaustion and lead to server restart. Also, try not to keep the session open and be stuck on the breakpoint for too long. TimeOutException and other exceptions might occur which will lead to further server resource consumption.
4. Clean up
After successful testing, returning the testing environment to its original state might be necessary. For example, build your current master/develop branch and place it back in the test environment. Then, if your colleagues do not notice that the testing environment does not work as it should, you did a good job cleaning after yourself and placing the project back in a stable state.
If you are on your own, I highly recommend cleaning after yourself too. You will never know when you will need to return to your projects again, and you might not remember why the testing environment is in a different state at that time.